Summary: How to use the snipping tool on Mac? Follow through the step-by-step guide and learn how to snip on Mac with ease.
Are you a Mac user struggling to find an efficient and effortless way to snip your screens? Well, your search ends here! Snipping on Mac is a breeze once you know the right tools and techniques. The Mac operating system comes equipped with a handy utility called Snip that allows you to take customized and targeted screenshots. Here in this post, we will guide you through how to snip on Mac and tailor these screenshots to your specific needs. Read on!

Jump to the section:
- 1. How to Snip on Mac with Shortcuts
- 2. How to Use Snipping Tool Bar on Mac
- 3. How to Capture Videos Using the Snipping Tool on Mac
- 4. How to Customize the Snipping Tool for Better Workflow
- 5. How to Add the Snipping Tool to the Touch Bar
- FAQs
How to Snip on Mac with Shortcuts
The quickest way to snip on Mac for screenshots is by using keyboard shortcuts, which allow you to activate the Snip tool in just a tap without having to navigate through menus. Here is how to do it:
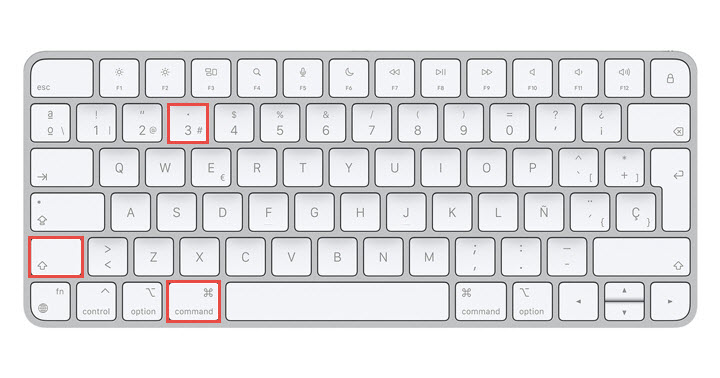
1. Take a screenshot of your full-screen
To take a snippet of the entire Mac screen, simply press Command+Shift+3, and your screenshot will be automatically saved as a PNG file on your desktop with a filename starting with "Picture" followed by a number (e.g., Picture 1, Picture 2, etc.).
Alternatively, if you want to copy the screenshot to your clipboard for pasting into another program like PowerPoint, Word, or Photoshop, press Command+Control+Shift+3, and then you can paste it directly into other applications.
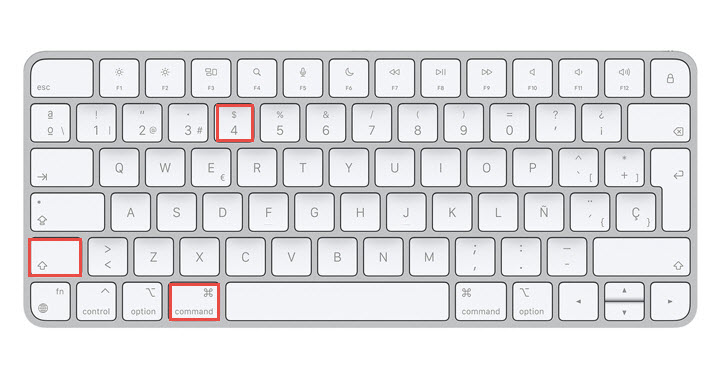
2. Take a screenshot of a part of your screen
To snip a specific area on your Mac screen, press Command+Shift+4, and this will change your mouse to a cross-hair cursor, allowing you to select precisely the portion you want by clicking and dragging. Upon releasing the mouse button, the captured screenshot will be saved directly to your desktop as a PNG file.
If you need to copy the Mac screenshot instead of saving it as a file, press Command+Control+Shift+4. This action also brings up a cross-hair cursor for you to select the desired screen area. After making your selection and releasing the mouse button, the screenshot will be copied to your clipboard, ready to be pasted into any application of your choice.
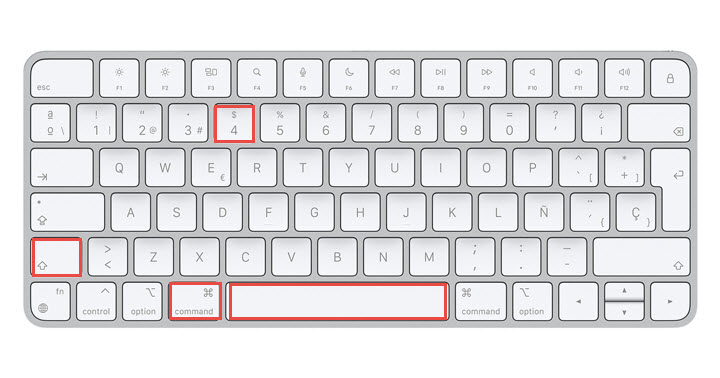
3. Take a screenshot of a selected window
To take a screenshot of a selected window with the snipping tool on Mac, press Command+Shift+4 and hit the Spacebar, and this will change your cursor into a camera icon. Hover over different application windows to choose the desired one you wish to snip on.
Still, if you wish to copy a screenshot of a specific window to your clipboard, use the combination Command+Control+Shift+4, and press Spacebar. Then follow the same action as above to copy and paste the screenshot.
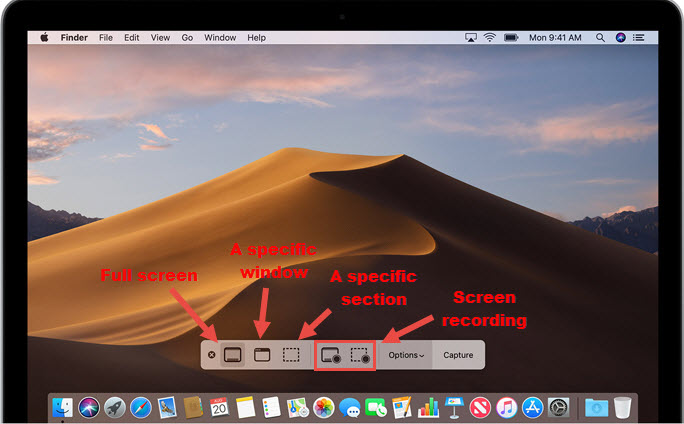
How to Use Snipping Tool Bar on Mac
To open the snipping tool control bar on Mac, press Shift+Command+5 on your keyboard. A menu bar will appear at the bottom of your screen with a set of screenshot options:
- Capture the entire screen
- Select and capture a specific window
- Select and capture a custom portion of the screen
- Snip a video of the full or selected portion of your Mac screen.
On top of the three screenshot options that provide equal results to snipping on a Mac with shortcuts, the Mac snipping toolbar also comes with a screen recording feature that allows you to record a video of the entire or a selected portion of your Mac screen, and an Options tab to customize your snipping process for a better workflow.
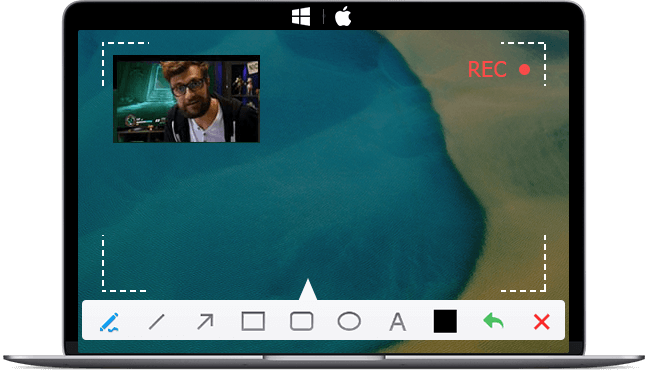
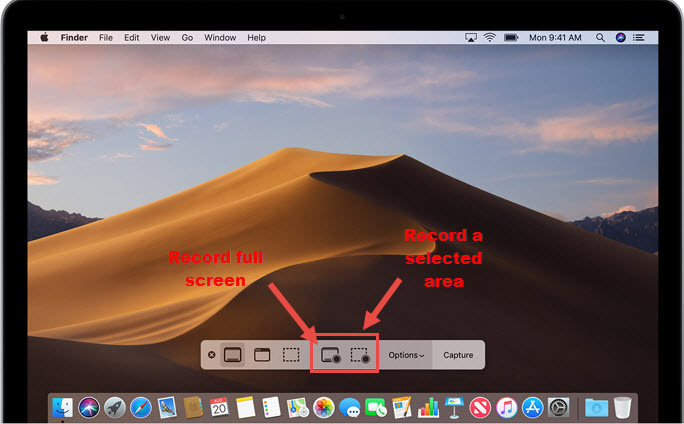
How to Capture Videos Using the Snipping Tool on Mac
To record a video using the snipping tool on Mac, press Shift+Command+5 to open the snipping toolbar, and locate the two screen recording icons. To record your full screen, click on the 'Record Entire Screen' button, and the 'Record Selected Portion' icon to record a custom area of your screen. The toolbar will disappear and your recording will begin. When you finish recording, press Shift+Command+5 again to stop the recording, and the screen recording will be saved to the same destination as your screenshots.

VideoProc Converter AI – Best and Easiest Way to Screen Record on Mac
- Record 4K screen on Mac smoothly with internal and microphone sound.
- Various recording modes on Mac: screen, pip, webcam, facecam, green screen, etc.
- Real-time recording tools: drawing, texts, lines, shapes, arrows…
- Customizable recording quality, format, hotkeys, and audio recordings.
- More to explore for your Mac recordings: AI upscale and enhance, compress, edit, convert…
Excellent ![]()
![]()

How to Customize the Snipping Tool for Better Workflow
As said above, the Options tab in the snipping tool bar allows you to customize the snipping settings to your preference. Here is a breakdown.
The Mac snipping tool saves screenshots by default to the Desktop, but you can choose where the screenshots are saved:
- Documents folder
- Clipboard
- Messages
- Preview
- Custom Location
Apart from customizing the file location of your Mac screenshots, you can also configure a delay for 5 or 10 seconds before snipping on Mac. Other customization options include whether you want to show the floating thumbnail and whether you want the cursor to show in your screenshot.

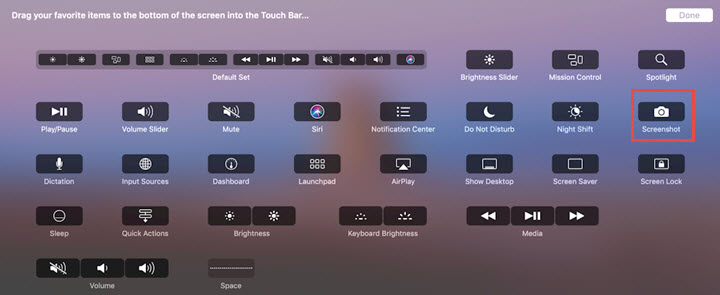
How to Add the Snipping Tool to the Touch Bar
If your MacBook comes with a Touch Bar, you can streamline the snipping process by adding the snipping tool to the Touch Bar and snip on your Mac from there. Here is how:
Step 1. Click on the Apple menu in the top-left corner of your screen. Select 'System Preferences' from the dropdown menu
Step 2. In the System Preferences panel, click on 'Keyboard', and go to the 'Touch Bar shows' section. Then click on the dropdown menu next to it, and select the 'App Controls' > 'Customize Control Strip'; find and select the Screenshot option in the list, and drag it to the Touch Bar area, and click Done.
Note that Touch Bar won't be captured as part of a standard screenshot when snipping on Mac. If you want to take a screenshot of the Touch Bar, press Command+Shift+6, and this can snip an image of the current Touch Bar layout and save it to the specified file location.
FAQs
1. Does Mac have a snipping tool?
Yes, Mac has a built-in snipping tool. You can access it by using the keyboard shortcut combination mentioned earlier in this post. Alternatively, you can press Command+Shift+5 to launch the snipping toolbar, which allows you to capture screenshots with ease.
2. How do I snip and paste on a Mac?
To snip and paste on Mac, you can use the shortcut Command+Control+Shift+3 for the entire screen, Command+Control+Shift+4 for a specific area, and Command+Control+Shift+4+Spacebar for a specific window on Mac. Alternatively, you can bring up the snipping toolbar by using Shift+Command+5, click on the Options tab, and select Clipboard in the Save to section.


