
In an era where video content reigns supreme, audio clarity is just as crucial as the visuals. When you shoot a video using an iPhone in a noisy place, the output video will be mixed up with ambient noise like wind, traffic, hum, ceiling fan, etc. Whether creating a vlog, recording a tutorial, or capturing precious moments with family, background noise can detract from the overall quality of your videos.
Fortunately, if you are an iPhone user, there are effective ways to remove unwanted sounds and enhance your audio experience. This article will show you how to remove background noise from video on iPhone through different methods. By mastering these techniques, you can ensure your videos look great and sound professional.
How to Remove Background Noise from Video on iPhone Free
Editing videos on your iPhone can be a seamless experience, especially with iMovie, the built-in free video editing app from Apple. There's an option to reduce background noise on iMovie for Mac, but unavailable for iMovie on iPhone. We can only detach and then delete the audio track entirely. While effective, it will eliminate everything on the original audio track, including sounds like music and multiple voices. It's only workable when you merely need the video.
Here's how to remove background noise from video on iPhone free.
Step 1. Import your video to iMovie.
Open iMovie and click Create Project > Movie to create a new project. Then, add your video to the timeline.

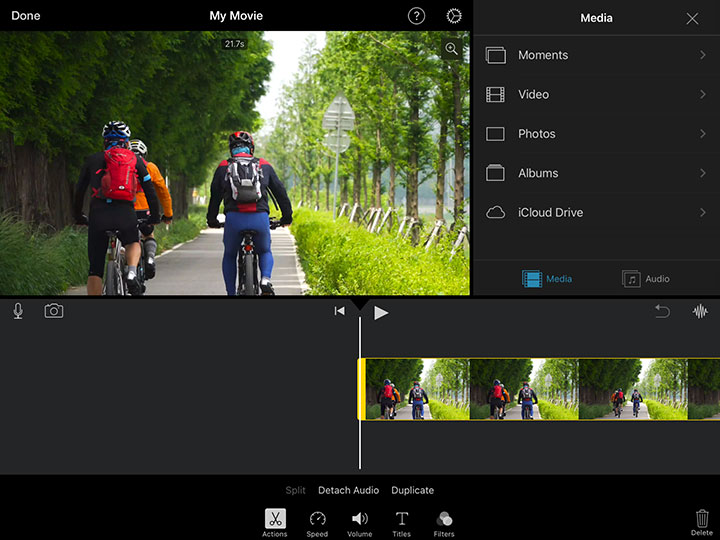
Step 2. Detach and delete the audio track.
Select the video clip in the timeline. Tap Actions > Detach Audio. The audio clip will be blue-colored beneath the parent video clip. Delete it.
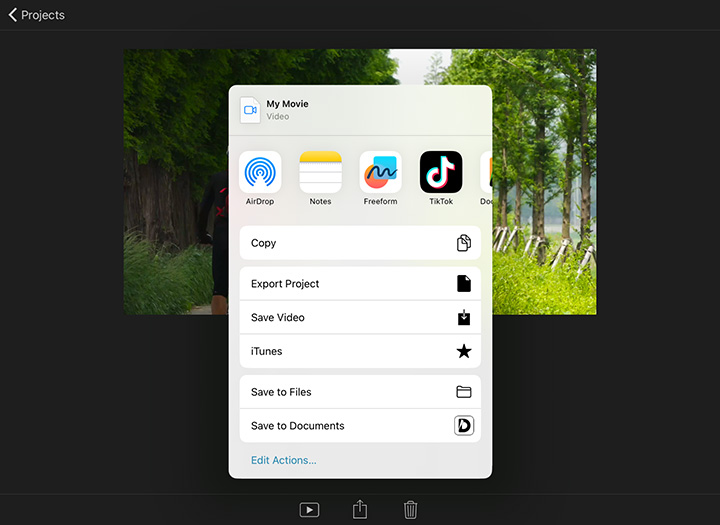
Step 3. Save the denoised video.
Click Done, then the Share icon > Save video to save the video.
AI Background Noise Removal
With technology advancements, removing unwanted sounds has become easier than ever. VideoProc Converter AI offers an AI noise suppression tool to intelligently distinguish between background noise and vocal tracks so you don't have to delete the audio track completely like you do with iMovie.
The AI noise suppression tool in VideoProc can manage various noise types, such as wind, traffic, and electrical hums. It adapts to different recording conditions, making it suitable for diverse applications like podcasts, interviews, and vlogs.
After transferring your iPhone videos to the Windows or macOS desktop, follow the steps below to remove background noise from iPhone videos with AI.

Step 1. Import your file and enable AI noise suppression.
Launch the software and go to the Audio AI module from the main interface. Drag and drop your files to the program. Select the check-box of Noise Suppression and select an AI model.

Step 2. Adjust the intensity of noise reduction.
Move the Noise Attenuation Limit slider to adjust the level of noise suppression between 0 through 100. The further to the right the slider is, the greater the value, the more noise reduction you'll get. Set to 6-12 for little noise reduction and 18-24 for medium reduction.
Set the Post-Filter Threshold to control how much additional noise is removed after the initial noise suppression process. A lower threshold (0.01-0.02) provides lighter filtering, preserving natural sound for quiet environments, while a higher threshold (0.03-0.05) applies stronger filtering, useful for moderate noise, such as background hum or distant chatter.
Use the Volume Control slider to adjust the value of Gain if the volume is lower than expected after the noise removal.

Step 3. Export the denoised files.
Set the audio codec and quality level according to your needs. Click RUN to process and clean up your audio.

Conclusion
In today's digital landscape, the importance of high-quality audio in video content cannot be overstated. Whether using iMovie to edit your videos or exploring advanced tools, removing background noise is essential for creating a professional and engaging viewing experience.
VideoProc Converter AI stands out as a reliable AI background noise remover for those seeking more robust solutions. Its advanced AI-driven technology offers superior noise suppression capabilities, allowing for precise control over audio quality while efficiently handling various noise types.