Summary: In this post, I'll explain what a rough cut is, what is the purpose of the rough cut editing, the common workflow to make a rough cut in VideoProc Vlogger, and everything others that you need to know about rough cuts.
Whether you are a filmmaker or a video editing amateur, you might have heard about the term - rough cut editing here or there. Video production is a labor-intensive and time-consuming process, especially when there are floods of footage. After getting all the footage for a video project, we need to manage them on a timeline-based sequence to make them into a new video. However, the long timeline and the piles of Tetris often make us hard to tell where to start. Luckily, we can divide our edit into a few stages to get an efficient workflow. And the rough cut editing is one of the most crucial of these video editing stages.
Define Rough Cut

A rough cut is the first pass assembly at figuring out the shape of the finished piece. In most cases, the rough cut doesn't involve music, transitions, VFX effects, or any refined extra elements. It's a crude and unpolished timeline-based sequence but can tell what your storytelling is about.
What Should a Rough Cut Look Like
Traditionally, editors assemble the trimmed and unrepeated clips in order, according to the demand of the storytelling. And this is also how video editing amateurs do to turn a pile of footage into videos. However, if you are working with a director, a producer, or a client, many chances you also need to add the music, animation elements, and some extra stuff to make the rough cut looked like nicer. After all, not all producers can understand the structure of your videos based on the rough version of the videos.
The Purpose of Rough Cut Editing
The main purpose of the rough cut editing is to build the shape of your storytelling. Therefore, instead of zeroing in on the details of music, rhythms, audio, and even the cut points, we should focus on the continuous and integrity of the video.
When editing movies or commercial ads, we need to add the master shot for each scene on the timeline according to the script and then trim and reorder the shots for outlining the story while keeping the whole story flow.
When editing an engaging video for sharing on social media, usually there isn't an outline. We can make a rough cut editing to clarify thoughts, build the story structure, and spark new ideas. Usually, we just need to trim off the redundant clips and then rearrange the clips according to the structure in our minds. In this stage, we need to make sure our audiences can understand what this story is about even there is no music or text.
How to Make a Rough Cut of Your Video
We can break down the steps of making a rough cut or our video into two:
- Step 1. Organize your media assets.
- Step 2. Build the time and space structure of time via free video editing software.
Step 1. Organize your Media Assets
We can classify the media assets according to the file types, such as video, audio, and project file for helping us quickly browse and find wanted media files during the edits.
We place the video files that's been recorded or downloaded under the video folder. To minimize confusion, we also need to create subfolders under the video folder, based on the scenes, shoot, etc.
The music and sound files are placed under the audio folder. In most cases, the audio folder can be subdivided into music, human voice, environmental sound, and sound effect. If necessary, you can divide the music folder into ambient music and ambient sound.
Step 2. Build the Time and Space Structure of Time via Video Editing Software
Place the media assets on the timeline and then rearrange them according to the camera and the shot types (such as long, middle, and close shots). After that, we trim off the shaky, blurred, and other unwanted clips. Next, we reorder the sequence of the shots for creating a continuous and flow storytelling as well as building the specific cinematic rhythm.
Now, let me show you how to edit the rough cut with VideoProc Vlogger - a 100% free video editing software available on Windows and Mac. It supports you to populate the timeline with video, audio, and picture files. You can add 999+ timeline tracks and roughly cut the video by trimming, splitting, rearranging, etc. Thanks to the support of frame-by-frame editing and a wide range of video editing tools such as audio editor, speed editor, voice changer, color editor and chroma key, it's also a perfect option for refining your video.

Highlights of VideoProc Vlogger
- Better organize the clips on the timeline by assigning different color tags.
- Add markers to both clips and timeline for quick and precise edits
- Let you trim unnecessary clips with or without leaving the gap.
- Quickly rearrange the clips in multiple ways.
- All around features: picture in picture, split screen, time remapping, transitions, etc.
- Support full GPU acceleration tech. It can add, edit, and export 4K videos without choppy.

1) Create a New Project
Open up VideoProc Vlogger. Enter the project name, select the output location folder, and assign the resolution and frame rate for creating a new project.
2) Add Videos to Timeline
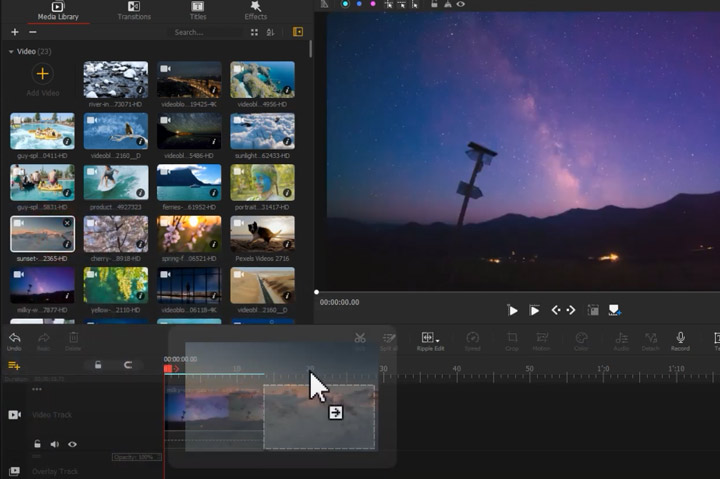
Select the folders that hold your media assets onto Media Library. We need to navigate all the video clips to find the best takes for different scenes. Drag them onto Video Track. You can also press Ctrl or Command on the keyboard and then select certain clips for adding them onto Video Track.
Tips:
As we might already know, a scene is made of different shots cut. Thus, we need to make sure the clips for the same scene should be placed together according to a certain order, such as the types of shots (long, full, middle, and close up shot, etc.).
If you've not yet decided what are the best clips for a scene, drag either of them onto Video Track and then drag the rests onto Overlay Track. You can press the plus button under the Overlay Track to add the new Overlay Track.
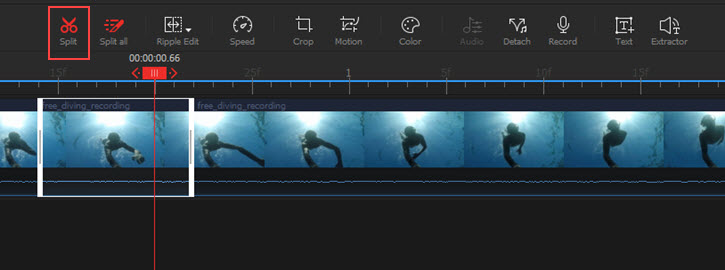
3) Cut Unwanted Videos
To cut an unwanted clip, select the target clip, and press the Backspace bar.
If you want to cut the middle part of a clip, select the target clip, use the Split tool to add the cut points at the start and end position of the unwanted part, select the unwanted part, and press the Backspace bar.
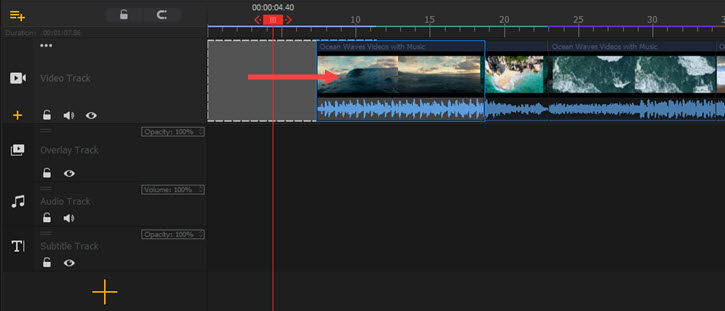
4) Reorder the Videos
You can select the video clip and move it around to change the order. If you want to reorder multiple videos simultaneously, press and hold the Ctrl or the Command key and then move around on the timeline.
Useful Tips When Making Rough Cuts
1. Don't focus on the details of the rough cuts. If we put too much attention on the details, we might easily ignore the outline of the video. Bear in mind, only when we build a clear storyline in the rough cut stage, the changes we made in the fine cut stage won't affect the intact of the story.
2. Nicholas Jarecki said,
when you're editing the film, you use a temp track. So you're putting music in there for a rough cut to keep track of what's going on. It can be a hindrance if wrong, it can be an enormous asset if you get it right.
Unless you've decided on the music for the final work, it's better not to add the music to the rough cuts. After all, the wrong music might affect the tone of the video.
3. The length of the rough cut is better to be 10% to 15% longer than the final video. After the rough cut editing, we need to make lots of tweaks and changes in details and a longer rough cut helps us make more editing choices available during the fine cut.
Rough Cut VS Assembly Cut
Walter Murch used to talk about his view on assembly cut: Looking at a first assembly is kind of like looking at an overgrown garden. You can't just wade in with a weed whacker; you don't yet know where the stems of the flowers are.
Well, assembly cut is the first stage of the video editing process. The editors recheck the recorded media asset and organize them and into different scenes. After that, they put the scenes together for the directors to view. In this phase, all the media assets are untrimmed. Thus, an assembly cut is usually much longer than the finished video. For example, Justice League 2017 released in theaters with a runtime of 2 hours, but the assembly cut is around 5 hours.
The stage after the assembly cut is the rough cut. The editors add the assembly cut into the timeline of the video editing software, and then select the clips, add the basic edit like trim, and reorder the clips. By doing this, the source video clips we organized in the assembly cut stage can outline the storytelling.

Rough Cut VS Fine Cut
Once we identified the rhythms and structures during the rough cut editing phase, we can start to refine every frame of the videos. We might need to replace some clips, chop out parts of some frames, add background music, perfect the voice overlay, fix the fisheye distortion, correct the credits' information, and color grade, etc. Therefore, briefly, the rough cut editing focuses on the entire story while the fine cut emphasizes the details of every cut.


