A user from the GoPro community complained the GoPro HERO10 footage looks grainy and noisy, even shooting outdoors in sunny weather. Similar grumbles of 'why does my GoPro footage look grainy' can be heard here and there; another GoPro user claimed he just bought a GoPro HERO11 the other day, but when he imported the footage filmed using GoPro Quick to his PC, the footage came out extremely grainy.
Though GoPro is counted as one of the best in the action camera industry and favored by most extreme sports enthusiasts, the complaints about GoPro HERO11/10/9/8/7 footage looking grainy have never ceased. Thus in this post, we will be taking you on a full journey, showing you how to troubleshoot the GoPro grainy video issue.
Why My GoPro Footage Looks Grainy
Your GoPro footage shot in HERO11/10/9/8 is likely to look perfect on the camera, but grainy on PC. Also, it might be 4K UHD in Quik but pixelated on YouTube. Well, the reasons vary from high ISO to low light to bad SD cards. For example, a random ISO setting would give a grainy GoPro video when shooting indoors and at night, and some other settings that could lead to a Grainy GoPro Video include:
- GoPro grainy video issue often happens when shooting in low light condition, for example, indoor and at night.
- Those GoPro recording settings would raise the possibility of video grain and noise: high ISO, fast shutter speed, and high frame rate.
- Using an unapproved SD card might pixelate an HD footage.
- Uploading a large 4K GoPro video to YouTube with wrong compression settings would drastically degrade your video, making it grainy, blurry or pixelated.
No worry, there are 13 ways you can use to reduce and avoid grainy footage.
Note: if the grainy video isn't the only issue you are struggling with while using GoPro HERO 11/10/9/8, you need to confirm what the problem is and use other methods to improve video quality.
How to Solve GoPro Grainy Video Issue
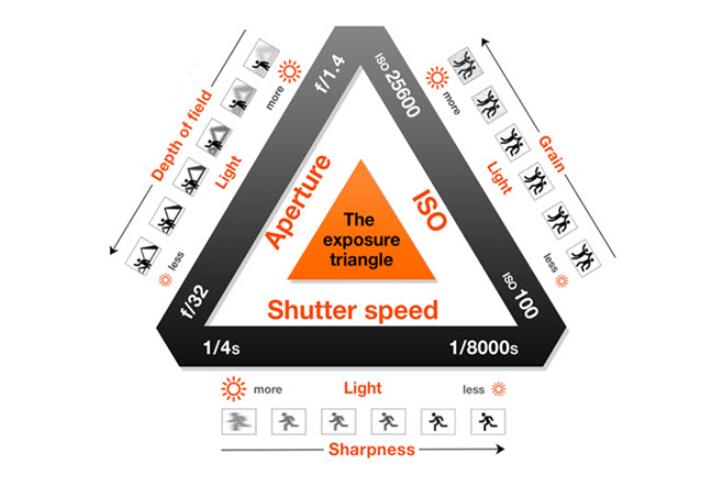
GoPro footage grainy problem is mostly caused by improper settings with low light shooting. To solve the video noise issue once and for all, you actually need some tips of the best GoPro settings for shooting at night. True, light level affects video quality a lot. No wonder that people want to make their night shots brighter. But the dilemma is there is always a compromise between noise and low light. And the light compensation can be done through the following three ways:
- Increase the aperture size (GoPro X)
- Decrease the shutter speed (GoPro √)
- Select high ISO (GoPro √)
But be careful with those settings as they might be the very reasons why your GoPro footage looks grainy. Thus, how to shoot a video with GoPro at night without grain or noise exactly? And is there any way to fix grainy footage in the post-editing process? Read through to learn the suggestions!
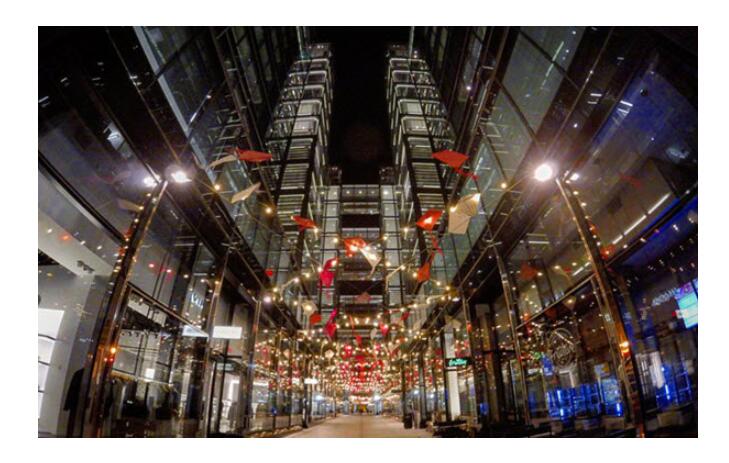
1. Before Shooting - Film in Well-Lit Areas to Avoid GoPro Grainy Video
Many shutterbugs get stumped on how to shoot in low light without grain, or rather, how to set a perfect exposure. You should know that light is the linchpin in getting proper exposure. If you have to film at night, there has to be enough light in the scene, or the video will either be too dark or too grainy. It doesn't need to be as bright as day. Just find some kind of light source. Below is an example of GoPro night shots without grain.
You can:
- Capitalize on streetlights
- Try different locations and angles
- Or add more light manually
2. While Shooting - Use Best GoPro Settings to Avoid GoPro Grainy Footage
A spot with enough light is just a prerequisite for shooting at night. To avoid GoPro video grainy issue, you still need to use correct camera settings, like ISO value, shutter speed, aperture, frame rate, SD cards, etc.
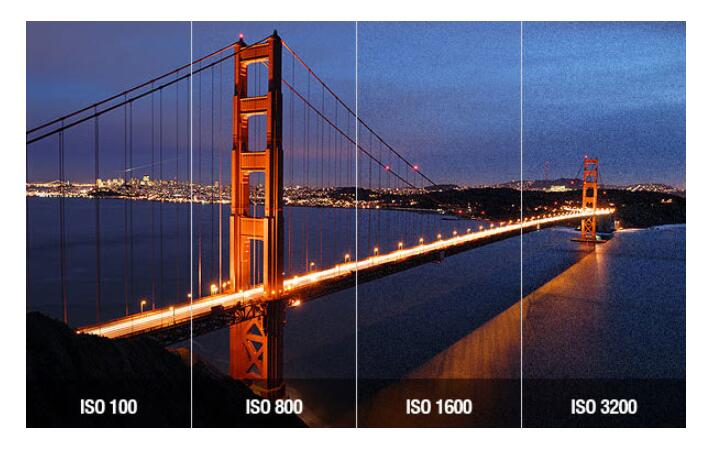
#1. Set low ISO value
Selecting higher ISO can make the sensor more sensitive to light and digitally brighten the scene. But do not go higher than ISO 1600 when shooting in low light with GoPro. Remember that the higher the ISO is, the more the grain will be. Seasoned YouTubers always set ISO max limit to 800 or 400, while some others even lock the ISO at 200. Low ISO definitely prevents you from getting grainy footage, although it outputs video really dark.
#2. Decrease shutter speed
Instead of increasing ISO, slow down the shutter speed to allow more light to enter the lense, so that your video gets brighter without grain. You'd better keep it between 1/30s and 1/50s. Slower shutter speed will let more light in, but it also means higher chance of light flickering and motion blur. So a tripod is needed to avoid blurry videos.
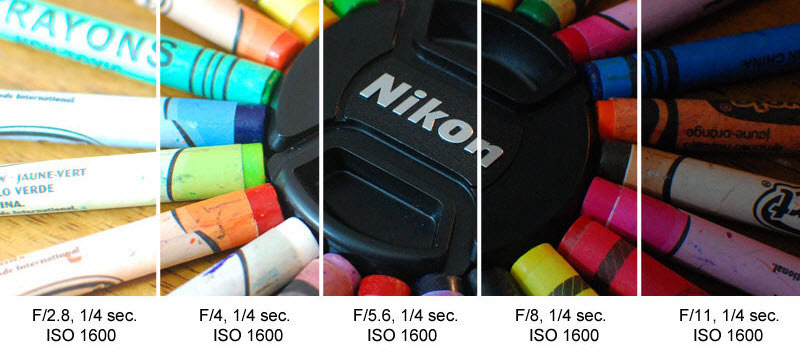
#3. Adjust aperture
The aperture should be between f/1.2 and f/5.6. Properly exposed ISO100 can give you clean bright image. However, you can't reduce GoPro video grain and noise by adjusting aperture as you do with other DSLR cameras. All GoPro HERO cameras have a fixed aperture lens at f/2.8, including GoPro HERO Session, GoPro HERO4 to HERO9, except the GoPro Hero 10 Black whose is at f/2.5. GoPro sets exposure and white balance automatically for your shot, but there is an Exposure compensation option in Protune Mode.
#4. Shoot in a lower frame rate
Frame rate affects shutter speed. Accordingly, it affects the amount of light getting in. Fps 60 gives a shutter speed of 1/60 while fps30 1/30. The higher the frame rate is, the less the light could be in and the more grain there will be. So do not shoot in high frame rates in low light. When shooting at night, 1080p at 60fps will be much clearer than 4K at 60fps. 30 fps could be better. Anything higher than 30fps leads to less desirable low light performance.
Or use "Auto Low Light Mode" in GoPro. What it does is automatically adjusting the frame rate down to 30 fps if your original option is 60 fps. It doesn't actually change the frame rate. You will still have 60 frames per second, but there are only 30 independent ones. All the rest are duplications. GoPro exposed twice for each frame to make it brighter.

#5. Use officially recommended SD cards
If there is no problem with your GoPro video recording settings, then check the SD cards. You should only use the officially approved SD cards. Be aware that video grainy and some other issues happen specifically when using a SanDisk Ultra.
#6. Other settings to avoid video grain
- Keep the sharpness on low or medium.
- Keep the white balance on auto.
- Turn on Protune Mode and set the ISO limit. Once you set the ISO, Exposure in Protune Mode won't affect your video quality whether you set it or not.
- Leave the other settings on default.
3. After Shooting - Use Video Editors to Reduce GoPro Grainy Footage
If you have chosen wrong GoPro settings and got a grainy, some editor software can give you a leg up. To reduce grain and noise in GoPro video, Adobe Premier Pro, Adobe After Effect, and VideoProc Converter AI are recommended most.
#1. How to reduce grain in GoPro video with Adobe Premiere Pro
Adobe Premiere Pro absolutely is an industrial standard video editing software. Even though it is a bit hard for beginners to understand, most of the video noise reduction guides you can find online are telling about how to reduce grain with Premiere. But if you are trying to fix shaky or blurry video, VideoProc Converter AI should be an easier alternative of Premiere for beginners. So how does Premiere Pro work with video noise? It simply blurs together the selected pixels in your frames, as a result of which individual specks of grain look less obvious.
Step 1. Download and install Premiere Pro from Creative Cloud on your computer. It offers a 7-day free trial for all newcomers.
Step 2. Import your grainy GoPro footage into Adobe Pr and add it to the timeline for video.
Step 3. Move to the Effects Panel and find 'Median' in 'Noise and Grain' under 'Video Effects'.
Step 4. Drag it onto your grainy footage and then go back to the Effects Control Panel.
Step 5. Change the radius value to make colors blend and select the mask tool. Pick a specific area of the video you want to reduce grain. If there are several areas that need to be cleaned up, apply the mask several times.
Step 6. Set the feather value and adjust the Radius based on your need. Grain should be reduced after that, although it won't be removed.
#2. Reduce GoPro video grain in Adobe Premiere Pro with plugins
Instead of grappling with how to reduce grain in Premiere Pro by yourselves, an easier way is to use plugins. Most plugins have versions for different video editors. For example, Neat Video is a plugin specifically designed for dealing with grainy videos. It can be used in Premier Pro, After Effects, Final Cut Pro, Vegas, etc.
Just drag it into the timeline and then find 'Reduce noise' under 'Video Effects' in the Effect Controls panel. There should be an Auto Profile, which picks up the grainy area and analyze the noise level. Apply the effect and noise will be reduced.

#3. How to reduce grain in GoPro video with Adobe After Effects
Step 1. Search 'Remove Grain' in the Effects & Presets panel, apply it to the video and you would see a rectangle on the footage, which can be dragged around to show you the noise reduction effect.
Step 2. Adjust the settings like Noise Reduction, the number of Passes and the Channel Mode. And you will get a comparatively clear footage. Surely there are advanced settings.
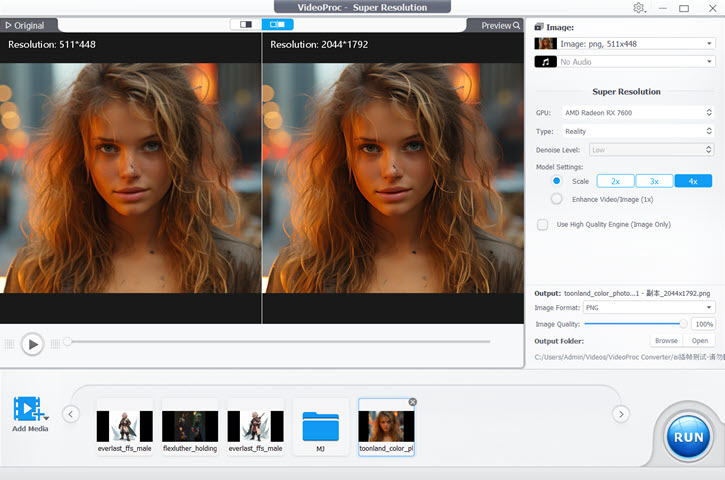
#4. How to reduce grain in GoPro video with VideoProc Converter AI
A feature in video editing tools and software called Super Resolution is made to improve the resolution and general quality of a video. It is especially helpful when you wish to upscale lower-quality movies to a higher resolution while preserving or enhancing their visual clarity.
In VideoProc Converter AI, there is a Super Resolution Through AI-based upscaling and restoration, you may improve the quality of videos and images. By increasing the pixels and scaling them up by 200%, 300%, or 400% to get up to 4K resolution, you can noticeably improve the quality of low-resolution footage. It means that you can clear up aged, loud, grainy, and compressed videos.
Step 1. Download and install VideoProc Converter AI on your computer.

Note: The Windows version now supports AI-powered Super Resolution, Frame Interpolation, and Stabilization to enhance video and image quality. These AI features are not yet available in the Mac version but will be coming soon.
Step 2. Choose the Super Resolution feature from the main UI.
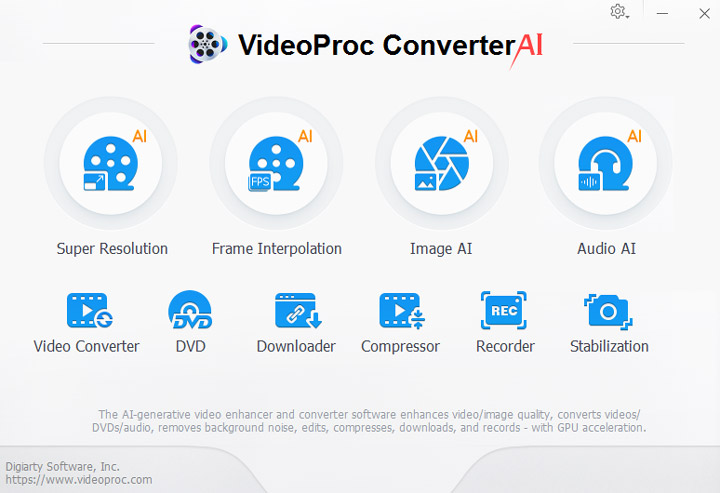
Step 3. Choose 2X, 3X or 4X upscaling, depending on your specific needs.